
GINGERSNAP
COOKIES
WITH EASY ROYAL ICING

Gingersnap Cookies – I was tossing between gingerbread cake or cookies. I decided to do cookies for a change, plus there will be some fun with the royal icing too. Cookies are best as a gift for the season, and they can last at least a month in an air tight container. Knowing there are so much to do such as cleaning and cooking for Christmas, this is will ideal to bake these in advance. You can prepack these in an air tight maison jars, which can be used for both decorations and giveaways. Hope you’re inspired to make these easy and amazing cookies. Enjoy!
Watch my YouTube video for clearer picture and steps for baking. Should you like my video. Kindly subscribe my channel, and give me a "like" if you enjoy my video as there are going to be more recipe video coming up every week. Also, leave your comments or questions if you have any. Thank you.
Ingredients:
Gingersnap Cookies
2 cups + 2 tbsp (265g) all-purpose flour or plain flour
1 ½ tsp baking soda
2 tsp ground ginger
1 ½ tsp ground cinnamon
¼ tsp ground cloves
½ tsp salt
¾ cup (168g) unsalted butter, room temp
2/3 cup (135g) brown sugar
¼ cup (85g) molasses
1 large egg, beaten
½ tsp vanilla extract
Royal Icing
1 egg white (pasteurised egg, safe to eat purpose)
1 tsp lemon juice
2 cups (250g) icing sugar or powdered sugar
Instructions:
Gingersnap Cookies
-
Preheat oven at 180°C/350°F.
-
In a bowl, add all the dry ingredients. Give them a good whisk. Set aside.
-
In another large bowl, add butter and sugar. Mix until creamy. Then add molasses and vanilla extract. I actually almost forgotten to add the vanilla which I added later. Add the egg. Mix them well to combine.
-
Add in the dry ingredients. Fold until the flour disappear, and dough will slowly come together.
-
Cover the dough with a cling film and refrigerate it for about 1 hour to harden the dough.
-
One hour later, use a cookie scoop to get uniform size, but you can use any spoons to scoop the dough. Roll it into a ball. Place the ball into a bowl of granulated sugar. Roll and cover it with the sugar, and then place it on a baking pan. Space out the dough, make sure there is space around each ball. Then use a flat surface to press down the dough to about half centimetre thick. I happened to have a measuring cup with a flat bottom, perfect for the use.
-
Bake them in the preheated oven at 180°C/350°F for 10-15 min depending on your desired chewiness or crispiness of the cookies. I baked 2 batches. One for about 10 min. Those give a softer and chewy texture. The other I baked for 15min. Those give a crispy texture. For are good for piping with royal icings.
Royal Icing
-
In a large bowl, add egg white, lemon juice and icing sugar. Mix until it is combined and sticky consistency.
-
Put about 1 tbsp each in 2 small bowls. Add the green and red colorings respectively. Transfer them into a piping bag immediately before drying up.
-
For the rest of the white icing, add water little by little as we need a more runny consistency for the white surface. Once you achieved the desired consistency, transfer into a piping bag immediately to avoid drying up.
-
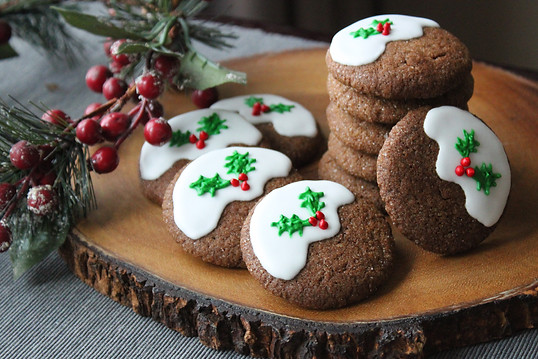
For this icing design, pipe the white surface first. Then let it rest for 2-3 min to set and dry before piping something on top. Then pipe the ornament on top and also let it rest for at least 5 min so that it is completely dry before serving or storing them.
.jpg)
.jpg)